展示:
# 框架设计
在制作之前,首先阅读了WebGL Programming Guide,对WebGL进行了简单的学习,读书笔记:https://1keven1.github.io/2021/11/25/%E3%80%90%E8%AF%BB%E4%B9%A6%E7%AC%94%E8%AE%B0%E3%80%91WebGLProgramingGuide/
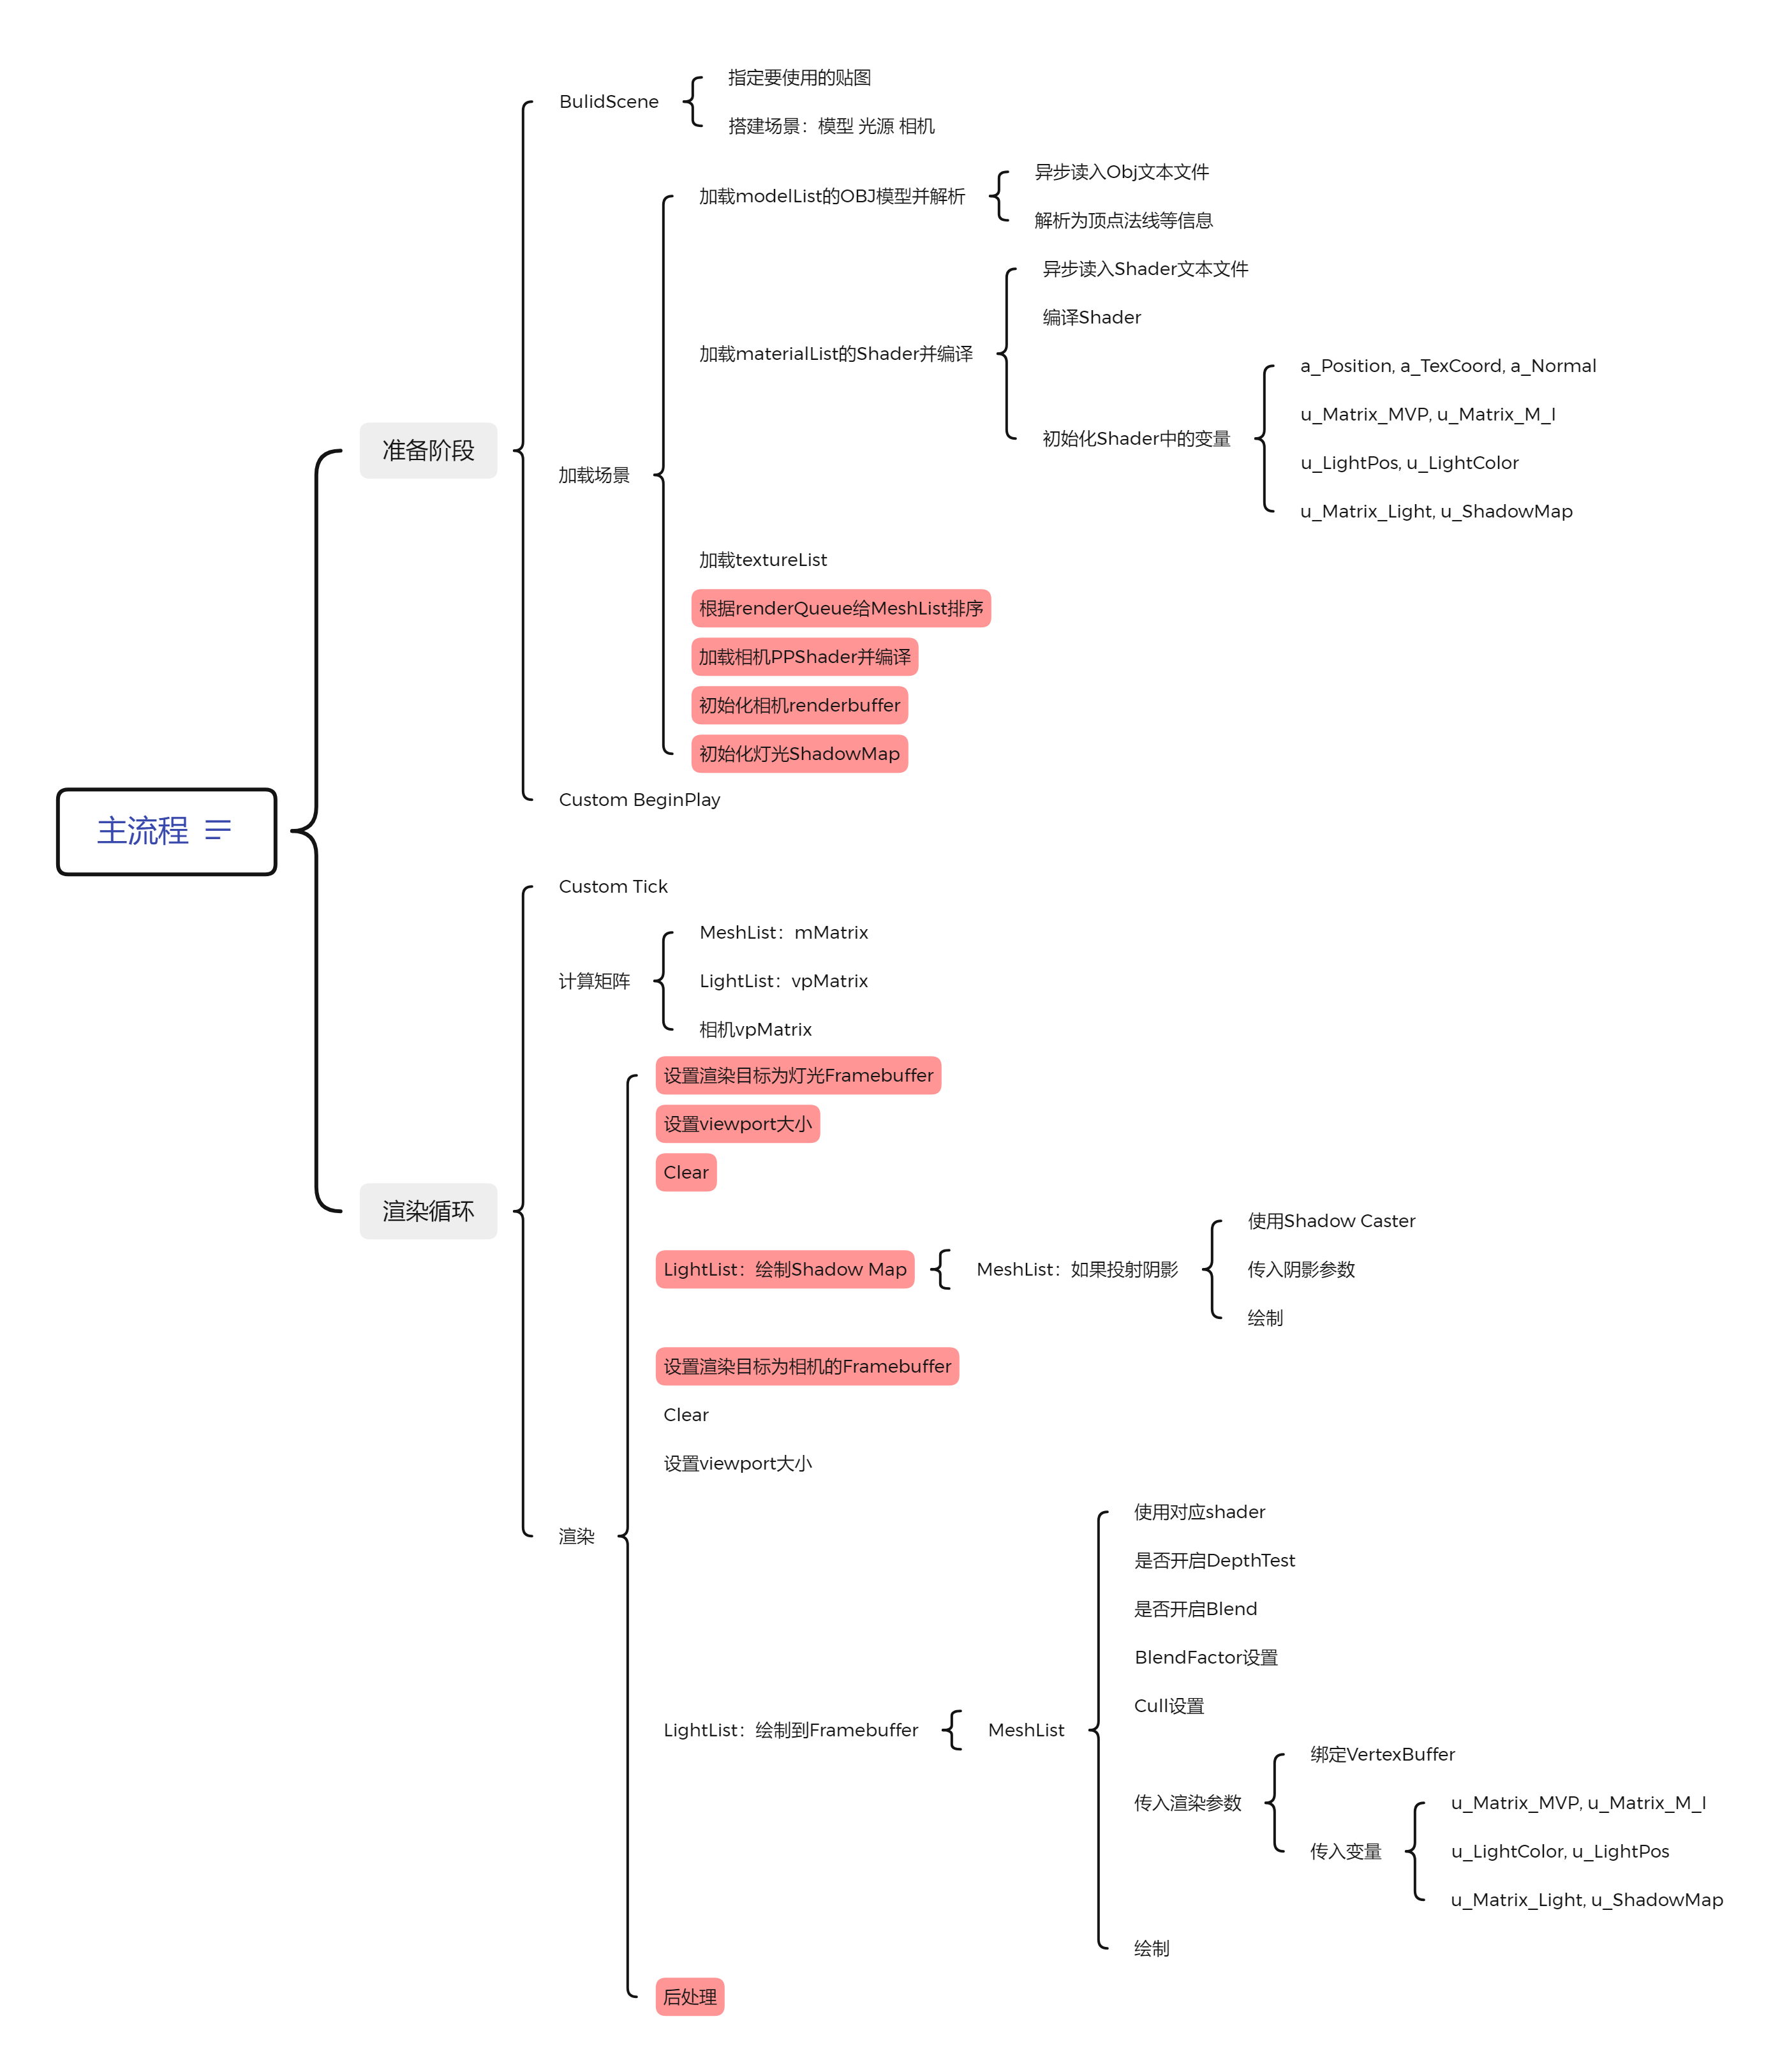
流程设计 根据WebGL的学习,借鉴了Unity的表现形式后,进行了如下图的流程设计:
采用更简单的前向渲染,其中标红的为以后再实现的功能。简单来说,就是首先搭建场景,然后加载Obj模型以及Shader文件并解码编译,一切都完成后开始渲染循环。
在渲染循环中,先绘制灯光的shadowmap,然后再逐个灯光,逐个物体绘制。最后进行后处理操作。
为了提升性能,将只用计算一次的矩阵提到循环初期,比如相机和光照的VP矩阵,模型的M矩阵等。
类设计
如上图所示,简单设计了一些类,学习UE引擎,有一个Actor基类,从其上派生出Camera、Light和Mesh
Mesh包含Material和Model,Model即为OBJ模型,Material包含几个Shader以及一些参数
下面就根据设计图进行初步实现
类的初步实现 先获取canvas以及gl
1
2
3
4
5
6
7
8
9
10
11
12
const canvas = document .querySelector ('canvas' );if (!canvas){ console .console .error ('获取Canvas失败' ); } const gl = getWebGLContext (canvas);if (!gl){ console .error ("Get WebGL Render Context Failed" ); } let width = canvas.width ;let height = canvas.height ;
Model类 传入文件以及模型缩放,然后实现load函数,加载解码Obj文件,并在加载完成后调用回调函数。
1
2
3
4
5
6
7
8
9
10
11
12
13
14
15
16
17
18
19
20
21
22
23
24
25
26
27
28
29
30
31
32
33
34
35
36
37
38
39
40
41
42
43
44
45
46
47
48
class Model { constructor (objFile, scale=1 ){ this .objFile = objFile; this .objSource = null ; this .scale = scale; this .vertices = new Array (0 ); this .texCoords = new Array (0 ); this .normals = new Array (0 ); this .faces = new Array (0 ); this .vertexBuffer = null ; this .texcoordBuffer = null ; this .normalBuffer = null ; this .indexBuffer = null ; this .indexNum = -1 ; this .bLoaded = false ; } load ( this .bLoaded = true ; this .loadOBJFile () } loadOver ( loadOBJFile ( let request = new XMLHttpRequest (); request.onreadystatechange = () => { if (request.readyState === 4 && request.status !== 404 ){ this .objSource = request.responseText ; if (!this .parseOBJ ()){ console .log ("分析OBJ文件失败: " + this .objFile ); } this .decodeBufferArrays (); this .loadOver () } } request.open ('GET' , this .objFile , true ); request.send (); } parseOBJ ( decodeBufferArrays ( }
具体的解码以及储存为Buffer函数比较复杂,请看这里:https://github.com/1keven1/WebGLRenderer/blob/main/Model.js
Shader类 传入顶点和片元着色器,实现load函数,读取编译shader,然后调用回调函数
1
2
3
4
5
6
7
8
9
10
11
12
13
14
15
16
17
18
19
20
21
22
23
24
25
26
27
28
29
30
31
32
33
34
35
36
37
38
39
40
41
42
43
44
45
46
47
48
49
50
51
52
53
54
55
56
57
class Shader { constructor (vShaderFile, fShaderFile ) { this .vShaderFile = vShaderFile; this .fShaderFile = fShaderFile; this .vShaderSource = null ; this .fShaderSource = null ; this .program = null ; this .a_Position = -1 ; this .a_TexCoord = -1 ; this .a_Normal = -1 ; this .u_Matrix_MVP = null ; this .u_Matrix_M_I = null ; this .u_LightPos = null ; this .u_LightColor = null ; this .u_Matrix_Light = null ; } load ( this .readShaderFile () } loadOver ( readShaderFile ( let vRequest = new XMLHttpRequest (); let fRequest = new XMLHttpRequest (); vRequest.onreadystatechange = () => { if (vRequest.readyState === 4 && vRequest.status !== 404 ){ this .vShaderSource = vRequest.responseText ; if (this .vShaderSource && this .fShaderSource ) this .compileShader (); } } fRequest.onreadystatechange = () => { if (fRequest.readyState === 4 && fRequest.status !== 404 ){ this .fShaderSource = fRequest.responseText ; if (this .vShaderSource && this .fShaderSource ) this .compileShader (); } } vRequest.open ('GET' , this .vShaderFile , true ); vRequest.send (); fRequest.open ('GET' , this .fShaderFile , true ); fRequest.send (); } compileShader ( this .program = createProgram (gl, this .vShaderSource , this .fShaderSource ); if (!this .program ){ console .error (this .vShaderFile + ':编译失败' ); } this .loadOver (); } }
具体createProgram函数的实现请看:https://github.com/1keven1/WebGLRenderer/blob/main/Lib/cuon-utils.js
Material类 首先新建材质类型的枚举值:
1
2
3
4
5
6
7
let MATERIAL_TYPE = { OPAQUE : Symbol (0 ), MASKED : Symbol (1 ), TRANSLUCENT : Symbol (2 ), ADDITIVE : Symbol (3 ) } Object .freeze (MATERIAL_TYPE );
在这里只考虑一个光照的情况,所以材质只包含一个base shader,后期会添加Add和Shadow Caster。同样也是实现load函数和回调函数。
1
2
3
4
5
6
7
8
9
10
11
12
13
14
15
16
17
18
19
20
21
22
23
24
25
26
27
28
29
30
31
32
33
34
35
36
37
38
39
40
41
42
43
44
45
46
47
48
49
50
51
52
53
54
55
56
57
58
59
60
61
62
63
64
65
66
67
68
69
70
71
72
73
74
75
76
77
78
79
80
81
82
83
84
85
86
87
88
class Material { constructor (baseShader, materialType = MATERIAL_TYPE.OPAQUE, queueOffset = 0 ){ this .baseShader = baseShader; this .setMaterialType (materialType, queueOffset); this .bLoaded = false ; } setMaterialType (materialType, offset ){ switch (materialType){ case MATERIAL_TYPE .OPAQUE : this .bDepthTest = true ; this .bCull = true ; this .bBlend = false ; this .srcFactor = gl.SRC_ALPHA ; this .desFactor = gl.ONE_MINUS_SRC_ALPHA ; this .renderQueue = 1000 + offset; break ; case MATERIAL_TYPE .MASKED : this .bDepthTest = true ; this .bCull = true ; this .bBlend = false ; this .srcFactor = gl.SRC_ALPHA ; this .desFactor = gl.ONE_MINUS_SRC_ALPHA ; this .renderQueue = 1500 + offset; break ; case MATERIAL_TYPE .TRANSLUCENT : this .bDepthTest = false ; this .bCull = true ; this .bBlend = true ; this .srcFactor = gl.SRC_ALPHA ; this .desFactor = gl.ONE_MINUS_SRC_ALPHA ; this .renderQueue = 2000 + offset; break ; case MATERIAL_TYPE .ADDITIVE : this .bDepthTest = false ; this .bCull = true ; this .bBlend = true ; this .srcFactor = gl.ONE ; this .desFactor = gl.ONE ; this .renderQueue = 2000 + offset; break ; default : this .bDepthTest = true ; this .bCull = true ; this .bBlend = false ; this .srcFactor = gl.SRC_ALPHA ; this .desFactor = gl.ONE_MINUS_SRC_ALPHA ; this .renderQueue = 1000 + offset; console .error ('材质类型不存在:' + materialType); break ; } } setBlendFactor (srcFactor, desFactor ){ this .srcFactor = srcFactor; this .desFactor = desFactor; } load ( this .bLoaded = true ; this .loadShader (); } loadOver ( loadShader ( this .baseShader .loadOver = this .shaderLoadOver .bind (this ); this .baseShader .load (); } shaderLoadOver ( this .baseShader .a_Position = gl.getAttribLocation (this .baseShader .program , 'a_Position' ); this .baseShader .a_TexCoord = gl.getAttribLocation (this .baseShader .program , 'a_TexCoord' ); this .baseShader .a_Normal = gl.getAttribLocation (this .baseShader .program , 'a_Normal' ); this .baseShader .u_Matrix_MVP = gl.getUniformLocation (this .baseShader .program , 'u_Matrix_MVP' ); this .baseShader .u_Matrix_M_I = gl.getUniformLocation (this .baseShader .program , 'u_Matrix_M_I' ); this .baseShader .u_LightPos = gl.getUniformLocation (this .baseShader .program , 'u_LightPos' ); this .baseShader .u_LightColor = gl.getUniformLocation (this .baseShader .program , 'u_LightColor' ); this .baseShader .u_Matrix_Light = gl.getUniformLocation (this .baseShader .program , 'u_Matrix_Light' ); this .loadOver (); } }
然后实现了一些工具函数,比如设置材质参数之类的,具体可以看:https://github.com/1keven1/WebGLRenderer/blob/main/Material.js
Actor基类以及子类 Transform类以及函数
1
2
3
4
5
6
7
8
9
10
function Transform (location = new Vector3([0 , 0 , 0 ]), rotation = new Vector3([0 , 0 , 0 ]), scale = new Vector3([1 , 1 , 1 ]) ){ this .location = location; this .rotation = rotation; this .scale = scale; } Transform .prototype copy = function ( let newTrans = new Transform (this .location .copy (), this .rotation .copy (), this .scale .copy ()); return newTrans; }
Actor类,实现一些对于Transform的函数
1
2
3
4
5
6
7
8
9
10
11
12
13
14
15
16
17
18
19
20
21
22
23
24
25
26
27
28
29
30
31
32
33
34
35
36
37
38
39
40
41
42
43
class Actor { constructor (transform = new Transform() ){ this .transform = transform; } getLocation ( return this .transform .location .copy (); } getRotation ( return this .transform .rotation .copy (); } getScale ( return this .transform .scale .copy (); } setLocation (location ){ this .transform .location = location; } setRotation (rotation ){ this .transform .rotation = rotation; } setLocationAndRotation (location, rotation ){ this .transform .location = location; this .transform .rotation = rotation; } setScale (scale ) { this .transform .scale = scale; } addLocationOffset (offset ){ this .transform .location .add (offset); } addRotationOffset (offset ){ this .transform .rotation .add (offset); } }
Mesh类,包含一个模型和一个材质,实现了构建M矩阵的方法
1
2
3
4
5
6
7
8
9
10
11
12
13
14
15
16
17
18
19
20
21
22
23
class Mesh extends Actor { constructor (transform, model, material, bCastShadow = true ){ super (transform); this .model = model; this .material = material; this .bCastShadow = bCastShadow; this .mMatrix = new Matrix4 (); this .mIMatrix = new Matrix4 (); } copy ( let newMesh = new Mesh (this .transform .copy (), this .model , this .material , this .bCastShadow ); return newMesh; } bulidMMatrix ( this .mMatrix .setTranslate (this .transform .location .x (), this .transform .location .y (), this .transform .location .z ()). rotate (this .transform .rotation .x (), 1 , 0 , 0 ).rotate (this .transform .rotation .y (), 0 , 1 , 0 ).rotate (this .transform .rotation .z (), 0 , 0 , 1 ). scale (this .transform .scale .x (), this .transform .scale .y (), this .transform .scale .z ()); this .mIMatrix .setInverseOf (this .mMatrix ); } }
Light类,首先还是实现灯光类型的枚举值
1
2
3
4
5
6
let LIGHT_TYPE = { DIRECTIONAL : Symbol (0 ), POINT : Symbol (1 ), SPOT : Symbol (2 ) } Object .freeze (LIGHT_TYPE );
灯光类包含灯光颜色,强度,类型,根据类型实现了VP矩阵的构建,方便后期制作shadow map使用
1
2
3
4
5
6
7
8
9
10
11
12
13
14
15
16
17
18
19
20
21
22
23
24
25
26
27
28
29
30
31
32
33
34
class Light extends Actor { constructor (transform, lightColor, intensity, lightType = LIGHT_TYPE.DIRECTIONAL ){ super (transform); this .lightColor = lightColor; this .intensity = intensity; this .lightType = lightType; this .vpMatrix = new Matrix4 (); this .shadowMap = null ; if (lightType === LIGHT_TYPE .DIRECTIONAL ) this .w = 0 ; else this .w = 1 ; } bulidVPMatrix ( switch (this .lightType ){ case LIGHT_TYPE .DIRECTIONAL : let rotateMatrix = new Matrix4 ().setRotate (this .transform .rotation .x (), 1 , 0 , 0 ).rotate (this .transform .rotation .y (), 0 , 1 , 0 ).rotate (this .transform .rotation .z (), 0 , 0 , 1 ); let lookVec = rotateMatrix.multiplyVector3 (new Vector3 ([0 , 0 , -1 ])); let upVec = rotateMatrix.multiplyVector3 (new Vector3 ([0 , 1 , 0 ])); this .vpMatrix .setOrtho (-7 , 7 , -7 , 7 , 1 , 100 ). lookAt (this .transform .location .x (), this .transform .location .y (), this .transform .location .z (), lookVec.x () + this .transform .location .x (), lookVec.y () + this .transform .location .y (), lookVec.z () + this .transform .location .z (), upVec.x (), upVec.y (), upVec.z ()); break ; case LIGHT_TYPE .POINT : break ; case LIGHT_TYPE .SPOT : break ; default : break ; } } }
Camera类,有FOV和远近剪裁平面组成,实现了计算相机VP矩阵的方法
1
2
3
4
5
6
7
8
9
10
11
12
13
14
15
16
17
18
19
20
21
22
class Camera extends Actor { constructor (transform, FOV = 60 , nearClip = 0.1 , farClip = 100 ){ super (transform); this .FOV = FOV ; this .nearClip = nearClip; this .farClip = farClip; this .vpMatrix = new Matrix4 (); } bulidVPMatrix ( let rotateMatrix = new Matrix4 ().setRotate (this .transform .rotation .x (), 1 , 0 , 0 ).rotate (this .transform .rotation .y (), 0 , 1 , 0 ).rotate (this .transform .rotation .z (), 0 , 0 , 1 ); let lookVec = rotateMatrix.multiplyVector3 (new Vector3 ([0 , 0 , -1 ])); let upVec = rotateMatrix.multiplyVector3 (new Vector3 ([0 , 1 , 0 ])); this .vpMatrix .setPerspective (this .FOV , width / height, this .nearClip , this .farClip ). lookAt ( this .transform .location .x (), this .transform .location .y (), this .transform .location .z (), lookVec.x () + this .transform .location .x (), lookVec.y () + this .transform .location .y (), lookVec.z () + this .transform .location .z (), upVec.x (), upVec.y (), upVec.z ()); } }
Texture类 输入文件路径和贴图单元序号即可,同样也需要加载和加载完成的回调函数
1
2
3
4
5
6
7
8
9
10
11
12
13
14
15
16
17
18
19
20
21
22
23
24
25
26
27
28
29
30
31
32
33
34
35
36
37
38
class Texture { constructor (texFile, texUnit, texType = gl.TEXTURE_2D ) { this .texFile = texFile; this .texUnit = texUnit; this .texType = texType; this .texture = null ; } load ( let texture = gl.createTexture (); if (!texture){ console .error (this .texFile + ':创建Texture失败' ); } let image = new Image (); image.onload = () => { gl.pixelStorei (gl.UNPACK_FLIP_Y_WEBGL , 1 ); gl.activeTexture (this .texUnit ); gl.bindTexture (this .texType , texture); gl.texParameteri (this .texType , gl.TEXTURE_MIN_FILTER , gl.LINEAR ); gl.texImage2D (this .texType , 0 , gl.RGBA , gl.RGBA , gl.UNSIGNED_BYTE , image); this .loadOver (); }; image.src = this .texFile ; this .texture = texture; } loadOver ( }
Scene类 Scene包含着整个场景中所有资源和要渲染的Mesh,所以要实现加载所有资源的方法。如果加载后发现MeshList中某个Mesh的资源没有加载,则剔除这个Mesh并报警告信息,以防止渲染错误。
1
2
3
4
5
6
7
8
9
10
11
12
13
14
15
16
17
18
19
20
21
22
23
24
25
26
27
28
29
30
31
32
33
34
35
36
37
38
39
40
41
42
43
44
45
46
47
48
49
50
51
52
53
54
55
56
57
58
59
60
61
62
63
64
65
66
67
68
class Scene { constructor (modelList, materialList, textureList, meshList, lightList, camera ){ this .modelList = modelList; this .materialList = materialList; this .textureList = textureList; this .meshList = meshList; this .lightList = lightList; this .camera = camera; this .modelLoadedNum = 0 ; this .materialLoadedNum = 0 ; this .textureLodedNum = 0 ; } load ( console .log ('loading scene' ); this .modelList .forEach ((model, index, arr ) => { model.loadOver = this .modelLoadOver .bind (this ); model.load () }) this .materialList .forEach ((material, index, arr ) => { material.loadOver = this .materialLoadOver .bind (this ); material.load (); }) this .textureList .forEach ((texture, index, arr ) => { texture.loadOver = this .textureLoadOver .bind (this ); texture.load (); }) } loadOver ( modelLoadOver ( console .log ('mesh load over' ); this .modelLoadedNum ++; this .checkIfLoadOver (); } materialLoadOver ( console .log ('mesh load over' ); this .materialLoadedNum ++; this .checkIfLoadOver (); } textureLoadOver ( console .log ('texture load over' ); this .textureLodedNum ++; this .checkIfLoadOver (); } checkIfLoadOver ( if (this .modelLoadedNum === this .modelList .length && this .materialLoadedNum === this .materialList .length && this .textureLodedNum === this .textureList .length ){ this .meshList .forEach ((mesh, index, arr ) => { if (!mesh.model .bLoaded || !mesh.material .bLoaded ){ if (!mesh.model .bLoaded ) console .warn (mesh.model .objFile + ':没有加载完整' ); if (!mesh.material .bLoaded ) console .warn (mesh.material .baseShader .vShaderFile + ':没有加载' ); this .meshList .splice (index, 1 ); } }) this .loadOver (); } } }
然后实现计算矩阵的方法
1
2
3
4
5
6
7
8
9
10
11
12
calculateMatrices ( this .meshList .forEach ((mesh, index, arr ) => { mesh.bulidMMatrix (); }) this .lightList .forEach ((light, index, arr ) => { light.bulidVPMatrix (); }) this .camera .bulidVPMatrix (); }
最后也是最重要的,就是渲染方法:
1
2
3
4
5
6
7
8
9
10
11
12
13
14
15
16
17
18
19
20
21
22
23
24
25
26
27
28
29
30
31
32
33
34
35
36
37
38
39
40
41
42
43
44
45
46
47
48
render ( gl.bindFramebuffer (gl.FRAMEBUFFER , null ); gl.viewport (0 , 0 , width, height); gl.clear (gl.COLOR_BUFFER_BIT | gl.DEPTH_BUFFER_BIT ); this .lightList .forEach ((light, lightIndex, arr ) => { this .meshList .forEach ((mesh, meshIndex, arr ) => { this .drawMesh (mesh, light, lightIndex); }) }) } drawMesh (mesh, light, lightIndex ) { if (lightIndex === 0 ) { gl.useProgram (mesh.material .getBaseProgram ()); if (mesh.material .bDepthTest ) gl.enable (gl.DEPTH_TEST ); else gl.disable (gl.DIPTH_TEST ); if (mesh.material .baseShader .a_Position >= 0 ) this .bindAttributeToBuffer (mesh.material .baseShader .a_Position , mesh.model .vertexBuffer ); if (mesh.material .baseShader .a_TexCoord >= 0 ) this .bindAttributeToBuffer (mesh.material .baseShader .a_TexCoord , mesh.model .texCoordBuffer ); if (mesh.material .baseShader .a_Normal >= 0 ) this .bindAttributeToBuffer (mesh.material .baseShader .a_Normal , mesh.model .normalBuffer ); gl.bindBuffer (gl.ELEMENT_ARRAY_BUFFER , mesh.model .indexBuffer ); if (mesh.material .baseShader .u_LightPos ) gl.uniform4f (mesh.material .baseShader .u_LightPos , light.getLocation ().x (), light.getLocation ().y (), light.getLocation ().z (), light.w ); if (mesh.material .baseShader .u_LightColor ) gl.uniform4f (mesh.material .baseShader .u_LightColor , light.lightColor .x (), light.lightColor .y (), light.lightColor .z (), 1 ); let mvpMatrix = new Matrix4 ().set (camera.vpMatrix ).multiply (mesh.mMatrix ); gl.uniformMatrix4fv (mesh.material .baseShader .u_Matrix_MVP , false , mvpMatrix.elements ); gl.uniformMatrix4fv (mesh.material .baseShader .u_Matrix_M_I , false , mesh.mIMatrix .elements ); let mvpMatrixLight = new Matrix4 ().set (light.vpMatrix ).multiply (mesh.mMatrix ); if (mesh.material .baseShader .u_Matrix_Light ) gl.uniformMatrix4fv (mesh.material .baseShader .u_Matrix_Light , false , mvpMatrixLight.elements ); gl.drawElements (gl.TRIANGLES , mesh.model .indexNum , mesh.model .indexBuffer .dataType , 0 ); } else { } } bindAttributeToBuffer (a_attribute, buffer ){ gl.bindBuffer (gl.ARRAY_BUFFER , buffer); gl.vertexAttribPointer (a_attribute, buffer.dataNum , buffer.dataType , false , 0 , 0 ); gl.enableVertexAttribArray (a_attribute); }
首先是对所有灯光,然后对所有mesh,进行渲染。
drawMesh相关较为复杂,可以看这里:https://1keven1.github.io/2021/11/25/%E3%80%90%E8%AF%BB%E4%B9%A6%E7%AC%94%E8%AE%B0%E3%80%91WebGLProgramingGuide/#Hello-Cube
渲染器类 通过Scene构造,在外部调用Start后开始加载资源,加载后开始渲染。其中的customBeginPlay和customTick可以再外部重写以实现一些简单的逻辑。
1
2
3
4
5
6
7
8
9
10
11
12
13
14
15
16
17
18
19
20
21
22
23
24
25
26
27
28
29
30
31
32
33
34
35
36
37
38
39
40
class WebGLRenderer { constructor (scene, editableMat = null ) { this .scene = scene; gl.clearColor (0 , 0 , 0 , 1 ); } start ( this .scene .loadOver = this .startRenderLoop .bind (this ); this .scene .load (); } customBeginPlay ( console .warn ('未重写Custom Begin Play' ); } startRenderLoop ( this .customBeginPlay (); console .log ('开始渲染循环' ); let lastTime = 0 ; let deltaSecond = 0 ; let renderLoop = (timeStamp ) => { deltaSecond = (timeStamp - lastTime) * 0.01 ; lastTime = timeStamp; this .customTick (deltaSecond); this .scene .calculateMatrices (); this .scene .render (); requestAnimationFrame (renderLoop); } renderLoop (0 ); } customTick (deltaSecond ){ console .warn ('未重写Custom Tick' ); } }
到这里,框架基本完成了
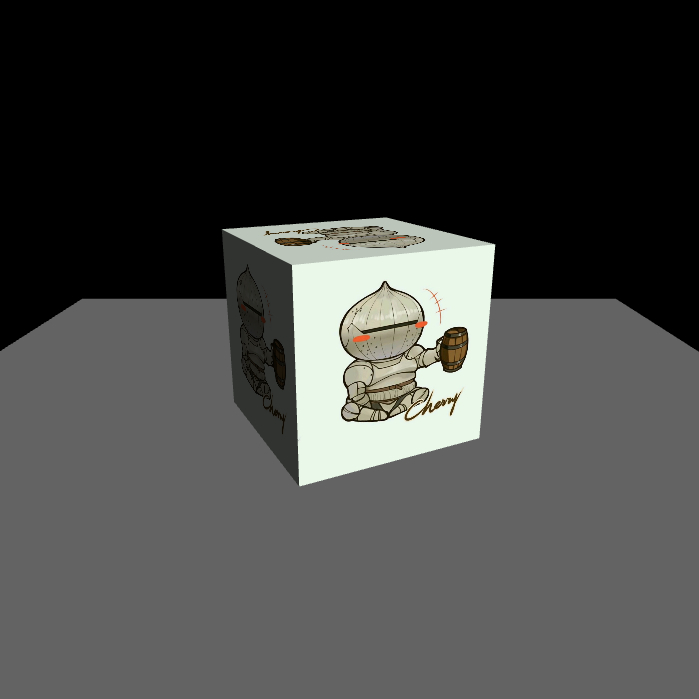
进行渲染测试 创建网页
1
2
3
4
5
6
7
8
9
10
11
12
13
14
15
16
17
18
19
20
21
22
23
24
25
26
27
<!DOCTYPE html > <html > <head > <meta charset ="utf-8" > <title > WebGL渲染器</title > </head > <body > <canvas width ="700" height ="700" > 请使用支持Canvas的浏览器</canvas > <textarea rows ="50" cols ="100" > </textarea > <script src ="./Lib/webgl-utils.js" > </script > <script src ="./Lib/webgl-debug.js" > </script > <script src ="./Lib/cuon-utils.js" > </script > <script src ="./Lib/cuon-matrix.js" > </script > <script src ="./Actor.js" > </script > <script src ="./Texture.js" > </script > <script src ="./Shader.js" > </script > <script src ="./Material.js" > </script > <script src ="./Model.js" > </script > <script src ="./Scene.js" > </script > <script src ="./WebGLRenderer.js" > </script > <script src ="./FunctionLibrary.js" > </script > <script src ="./Main.js" > </script > </body > </html >
构建真正运行的脚本:
1
2
3
4
5
6
7
8
9
10
11
12
13
14
15
16
17
18
19
20
21
22
23
24
25
26
27
28
29
30
31
32
33
34
35
36
37
38
39
40
41
42
43
44
45
46
47
48
49
50
51
52
53
54
55
56
let camera = new Camera (new Transform (new Vector3 ([0.0 , 2.0 , 6.0 ]), new Vector3 ([-20 , 0 , 0 ])), 60 , 0.1 , 100 );let light = new Light (new Transform (new Vector3 ([10.0 , 10.0 , 10.0 ]), new Vector3 ([0 , 0 , 0 ])), new Vector3 ([1.0 , 1.0 , 1.0 ]), 10 );let diffuseShader = new Shader ('./Resource/DefaultShader/Diffuse.vert' , './Resource/DefaultShader/Diffuse.frag' );let diffuseMaterial = new Material (diffuseShader, MATERIAL_TYPE .OPAQUE , 0 );let texShader = new Shader ('./Resource/DefaultShader/DiffuseTex.vert' , './Resource/DefaultShader/DiffuseTex.frag' );let texMaterial = new Material (texShader);let cube = new Model ('./Resource/Cube.obj' );let plane = new Model ('./Resource/Plane.obj' );let sphere = new Model ('./Resource/Sphere.obj' )let meshCube = new Mesh (new Transform (), cube, texMaterial);let floor = new Mesh (new Transform (new Vector3 ([0 , -1 , 0 ])), plane, diffuseMaterial);let texture = new Texture ('./Resource/test.jpg' , gl.TEXTURE0 , gl.TEXTURE_2D );let scene = new Scene ( [cube, sphere, plane], [diffuseMaterial, texMaterial], [texture], [meshCube, floor], [light], camera ); let renderer = new WebGLRenderer (scene);renderer.customBeginPlay = () => { diffuseMaterial.setUniformVector3f ('u_AmbientColor' , 0.2 , 0.2 , 0.2 ); texMaterial.setUniformVector3f ('u_AmbientColor' , 0.2 , 0.2 , 0.2 ); texMaterial.setTexture ('u_Tex' , 0 ); document .onmousedown = () => { meshCube.material = diffuseMaterial; meshCube.model = sphere; floor.material = texMaterial; } document .onmouseup = () => { meshCube.material = texMaterial; meshCube.model = cube; floor.material = diffuseMaterial; } } renderer.customTick = (deltaSecond ) => { meshCube.addRotationOffset (new Vector3 ([0 , 1.5 , 0 ]).multiplyf (deltaSecond)); } renderer.start ();
上面都在创建资源,然后输入到Scene中,最后传入到WebGLRenderer类里;再重写类的两个函数,在BeginPlay中设置了两个材质的参数和贴图,写了鼠标函数;在Tick中让Cube缓慢旋转,最后Start。
资源 网址:https://1keven1.github.io/BlogSrc/WebGLRenderer/SimpleDemo.html

 微信
微信